

The global smart agriculture market is valued at $286.5 billion in 2024 and is expected to reach $550-600 billion by 2030, growing at a CAGR of 10-12%. A significant driver of this growth is the need for real-time data from remote fields, greenhouses, and livestock facilities.
According to IoT Analytics, 40–50% of agricultural IoT devices now use cellular connectivity—and that number is rising. Because cellular networks (4G LTE, 5G) provide reliable coverage in rural areas without the cost of trenching fiber or installing private radio networks. The main part of these systems is the 4G cellular modem, often called a 4G DTU.
This guide walks through setting up a 4G cellular modem for smart agriculture, with market data, real-world deployment examples, and troubleshooting tips. It’s written for system integrators, farmers, and technicians who need a clear, step-by-step process that actually works in the field.

Why Industrial-Grade Hardware Matters in Agriculture
Before we wire anything, let’s talk about why an industrial 4G modem is worth the extra cost over a consumer-grade device. Consumer devices used in farms break down 3 to 5 times more often than equipment made for industrial use within the first two years.
- Operating Temperature: Consumer routers handle 0°C to 40°C, while industrial DTUs handle –40°C to 85°C.
- Enclosure: Industrial units feature metal EMI shielding compared to plastic consumer routers.
- Power Input: Industrial units accept wide 9–36V DC inputs, unlike consumer 5V USB setups.
- Protocol Conversion: Industrial modems natively support Modbus RTU to JSON and MQTT.
The extra money you pay at first is quickly made up for by not having to deal with equipment downtime and replacement labor.
Step-by-Step Setup Guide
Step 1: Market Reality Check — Why You Need Industrial Grade
Before we wire anything, let’s talk about why an industrial 4G modem is worth the extra cost over a consumer‑grade device.
| Feature | Consumer 4G Router | Industrial 4G Modem (DTU) |
|---|---|---|
| Operating temperature | 0°C to 40°C | –40°C to 85°C |
| Enclosure | Plastic | Metal (EMI shielding) |
| Power input | 5V USB or 12V fixed | 9–36V DC (wide range) |
| Mounting | Desktop | DIN rail |
| Cellular failover | None | Dual SIM with auto‑switch |
| Protocol conversion | Basic | Modbus RTU to JSON, MQTT |
| MTBF | <50,000 hours | >100,000 hours |
According to the data on how reliable industry equipment’s devices that consumers use in farms and similar settings break down 3 to 5 times more often, than equipment made for industrial use within the first two years. The extra money you pay at first for equipment is quickly made up for by not having to deal with equipment downtime and by not having to pay for replacement labor.
Step 2: Hardware Connections
Let’s get the hardware connected. Follow these steps in order.
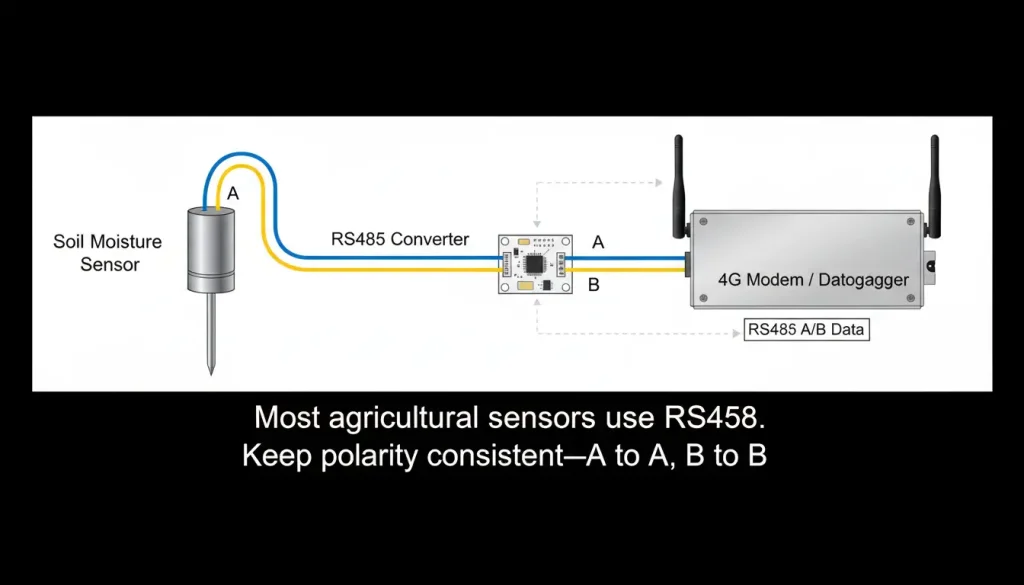
2.1 Connect Your Sensors
Most agricultural sensors use RS485 with the Modbus RTU protocol. This is a two‑wire bus (A and B) that can run up to 1,200 meters.
| Sensor Terminal | Modem Terminal |
|---|---|
| A (Data+) | A (or Data+) |
| B (Data-) | B (or Data-) |
| GND | GND (optional, but recommended for long runs) |
Important: If you get no data, try swapping A and B. It won’t damage anything.
2.2 Power the Modem
Connect the power supply to the modem’s terminal block. Most industrial modems accept 9–36V DC. If you’re in a greenhouse with a 24V panel, you can wire directly to the panel’s DC output.
2.3 Insert the SIM Card
Insert a standard‑size SIM card (check your modem’s SIM slot type—most use micro or nano) into the SIM slot. Ensure it’s seated firmly.
Pro tip: When you are using something for farming you should use a -carrier SIM or a modem with two SIM slots. The signal for your phone can be really bad in the country. So it is an idea to have a backup carrier for your cellular service. This way your multi-carrier SIM or modem, with SIM slots will always be connected to the internet.
2.4 Connect the Antenna
Screw the cellular antenna onto the SMA connector. For installations inside metal cabinets, use an external antenna mounted outside the cabinet for better signal.
Step 3: Power On and Initial Check
Once everything is connected:
- Apply power to the modem
- Wait 30–60 seconds for it to boot and register on the cellular network
- Check the LED indicators:
- Power LED: Solid = power OK
- Network LED: Blinking = searching; Solid = registered on cellular network
- Data LED: Blinking = data transmission active
If the network LED stays blinking for more than 2 minutes, check the SIM card, antenna connection, and cellular coverage at your location.
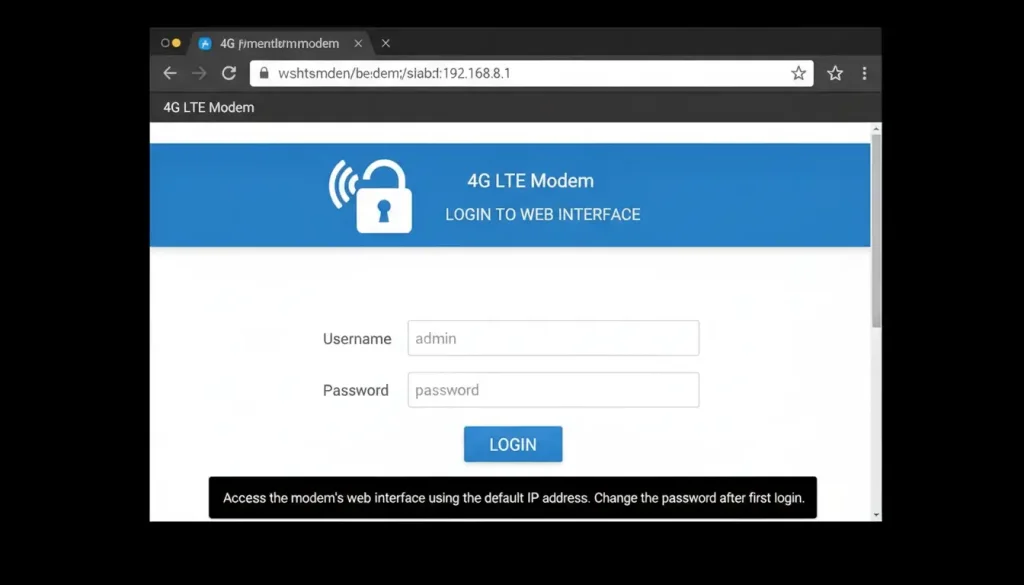
Step 4: Access the Web Configuration Interface
Most industrial 4G modems have a built‑in web server for configuration.
- Connect a computer to the modem’s Ethernet port (or connect to its Wi‑Fi if available)
- Open a browser and enter the modem’s default IP address (check the manual—common defaults are
192.168.1.1,192.168.0.1, or192.168.2.1) - Log in with the default username and password (usually
admin/adminoradmin/password)
Step 5: Configure Cellular Network Settings
In most cases, the modem will automatically connect to the cellular network using the SIM card’s default APN. If not, you’ll need to configure the APN (Access Point Name) manually.
How to find the APN:
- Check your SIM carrier’s documentation
- Common APNs:
internet,iot,mobile.three.com.hk,vzwinternet(Verizon)
To configure:
- Navigate to the “Cellular” or “Network” settings section
- Set APN to the carrier’s value
- Leave username/password blank unless required
- Set network mode to “4G preferred” or “LTE”
- Save and reboot if prompted
For dual‑SIM modems: Configure both SIM slots with their respective APNs and set failover rules (e.g., switch to SIM2 after 3 failed connection attempts).
Step 6: Configure Serial Port Settings
This is the most critical step for connecting sensors. Every setting here must match your sensor’s configuration.
Navigate to the “Serial Port” or “RS485” settings section. Set:
| Parameter | Typical Agricultural Sensor Value |
|---|---|
| Baud rate | 9600, 19200, or 115200 |
| Data bits | 8 |
| Parity | None |
| Stop bits | 1 |
| Flow control | None |
Where to find these values: Check your sensor’s manual. If you don’t have it, try common defaults (9600, 8, N, 1) which work for over 70% of Modbus sensors.
If these don’t match your sensor, you’ll get no data or garbled data.
Step 7: Configure Protocol Conversion (Modbus to JSON)
Modern cloud platforms expect data in JSON format over MQTT or HTTP. Your 4G modem should be able to convert Modbus RTU registers into JSON payloads.
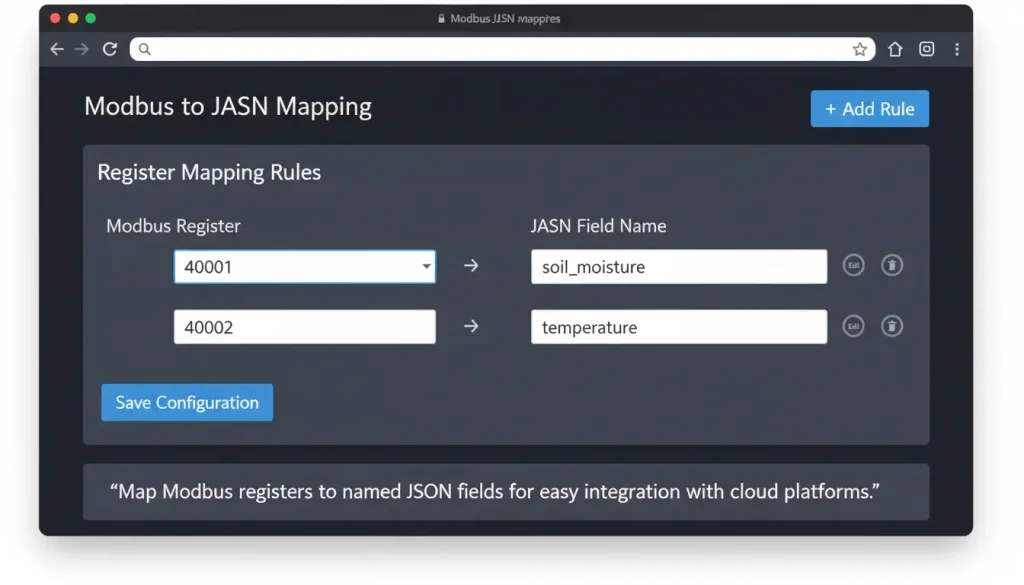
Example JSON mapping for an agricultural sensor:
json
{
  "device_id": "greenhouse_01",
  "timestamp": "$register_40001",
  "soil_moisture": "$register_40002",
  "temperature": "$register_40003",
  "humidity": "$register_40004"
}
To configure:
- Find the “Protocol Conversion” or “Modbus to JSON” section
- Add each Modbus register you want to read
- Assign a meaningful name to each field (e.g.,
soil_moisture,temp) - Set data type (float, integer, string) based on the register’s value
- Save configuration
🔥 Pro Tip for Integrators: Instead of deploying external edge computers for data parsing, we strongly recommend using smart edge gateways like the VT-DTU300 Cellular Gateway. It has native Modbus to JSON parsing, Offline Data Storage (with a strict zero data loss guarantee in case of temporary cellular network drops).
Step 8: Configure Data Transmission to the Cloud
Now, tell the modem where to send the data.
Option 1: MQTT (Recommended for IoT)
MQTT is the standard protocol for IoT applications. It’s lightweight, efficient, and works well over cellular networks.
| Parameter | Setting |
|---|---|
| Broker address | mqtt.[your-broker-domain].com |
| Port | 8883 (TLS) or 1883 (non‑TLS) |
| Client ID | Unique per device (e.g., greenhouse_01) |
| Username | [assigned by your platform] |
| Password | [assigned by your platform] |
| Publish topic | farm/sensors/greenhouse_01/data |
| QoS | 1 (at least once) |
| TLS/SSL | Enabled for security |
Option 2: HTTP (Simple REST API)
If your platform expects HTTP POST requests:
| Parameter | Setting |
|---|---|
| URL | https://your-platform.com/api/sensors |
| Method | POST |
| Content type | application/json |
| Headers | Authorization: Bearer [token] |
Option 3: TCP (Custom Server)
For custom applications, you can send raw TCP data to a specific IP and port.
Step 9: Set Data Reporting Intervals
To conserve data usage and battery life, set appropriate reporting intervals.
| Application | Recommended Interval |
|---|---|
| Real‑time monitoring (greenhouses) | 1–5 minutes |
| Soil moisture for irrigation | 15–30 minutes |
| Weather stations | 10–60 minutes |
| Livestock location | 5–15 minutes |
| Battery‑powered sensors | 1–4 hours |
Pro tip: Enable on‑change reporting for critical parameters (e.g., send immediately if soil moisture drops below threshold). This saves bandwidth while maintaining responsiveness.
Step 10: Test and Validate
Once configuration is complete:
- Power cycle the modem (unplug, wait 10 seconds, plug back in)
- Check LED indicators: Network LED should be solid, Data LED should blink when data is transmitted
- Trigger a sensor reading: For soil moisture, water the area; for temperature, warm the sensor
- Check your cloud platform: New data should appear within the reporting interval
If data doesn’t appear, use the modem’s built‑in data monitor:
- Navigate to “Data Monitor” or “Debug” section
- View raw Modbus data coming from the sensor
- Verify that registers are updating
- Check the outgoing JSON payload format
Troubleshooting Decision Flowchart
- Start → Can you ping the modem? No → Check power, Ethernet cable, IP address
- Yes → Can you access web interface? No → Check firewall, browser, reset to defaults
- Yes → Network LED solid? No → Check SIM, APN, antenna, cellular coverage
- Yes → Serial data appearing? No → Check RS485 wiring, swap A/B, verify sensor settings
- Yes → Data appearing on cloud? No → Check MQTT broker settings, port, credentials
- Fixed → Done
| Symptom | Likely Cause | Try This |
|---|---|---|
| No network connection | SIM not activated, wrong APN | Check SIM data plan, verify APN with carrier |
| Web interface loads slowly | Network congestion, modem busy | Wait, reduce polling interval |
| Sensor data not showing | Wrong baud rate, wiring swapped | Verify sensor settings, swap A/B |
| Data on platform but garbled | Modbus to JSON mapping wrong | Check register addresses, data types |
| Intermittent connection | Weak cellular signal | Add external antenna, move modem location |
Real‑World Deployment Example: Greenhouse Monitoring
Scenario: A 5,000 sq ft greenhouse needed to monitor soil moisture, temperature, and humidity across 20 zones. The greenhouse had no wired internet but had good 4G coverage.
Hardware:
- 20 soil moisture sensors (RS485, Modbus RTU)
- 10 temperature/humidity sensors (RS485, Modbus RTU)
- 1 industrial 4G modem with dual SIM and RS485 port
- Solar‑powered battery system
Configuration:
- All sensors daisy‑chained on a single RS485 bus
- Modem configured with APN from local carrier
- Serial settings: 9600, 8, N, 1
- Modbus to JSON: each sensor mapped to separate device ID
- MQTT publishing to cloud platform every 10 minutes
- Dual SIM failover enabled (two carriers)
Results after 6 months:
- 99.8% uptime (dual SIM prevented two outages)
- 35% reduction in water use (irrigation only when soil moisture dropped below threshold)
- $12,000 annual labor savings (no manual sensor readings)
- Payback period: 8 months
Pre‑Deployment Checklist
Before installing in the field, confirm:
- Cellular coverage — Test signal strength (RSSI) at each location. Aim for > –85 dBm.
- Power availability — 24V DC from panel? Solar with battery? Ensure sufficient capacity.
- SIM cards — Data plans sized for expected traffic (500MB–2GB per month typical)
- Sensor compatibility — Modbus RTU settings match modem configuration
- RS485 wiring — Polarity correct, shield grounded at one end
- Antenna placement — External antenna routed outside metal cabinets
- Cloud platform — MQTT broker accessible from cellular network
- Device management — Plan for remote firmware updates and configuration changes
Want to upgrade your farm’s telemetry network? Browse our Complete Guide to Industrial Cellular Modems & Routers or contact our engineering team to select the best gateway for your smart agriculture project.
Frequently Asked Questions
Q1: How much cellular data does an MQTT-based agricultural sensor network typically consume per month?
A: Very little. Unlike continuous legacy polling, MQTT over 4G uses highly compressed JSON payloads. If you configure your sensors (e.g., soil moisture, temperature) to report every 15 minutes or trigger only on threshold changes, a typical greenhouse setup uses less than 30MB to 50MB of data per month. You can easily operate on low-cost IoT M2M SIM plans.
Q2: Will transmitting Modbus RTU over a 4G LTE network cause timeout errors due to cellular latency?
A: It can if you use a basic transparent modem. Modbus RTU is a serial protocol with strict timing requirements. That is why we strongly recommend gateways that perform Edge Local Polling. The gateway instantly reads the sensors locally and pushes lightweight MQTT data to the cloud, completely decoupling serial timing from 4G network latency.
Q3: Can I power the industrial 4G modem directly from an off-grid solar panel system?
A: Yes. Most consumer routers require a fragile 5V USB connection, which is impractical in the field. Industrial 4G DTUs are designed with wide 9-36V DC terminal blocks. You can wire them directly into the 12V or 24V load terminals of a standard solar charge controller inside your waterproof enclosure.
Q4: How far away can my soil sensors be from the central 4G gateway?
A: Industrial gateways connect to field sensors over RS485, enabling you to daisy-chain devices up to 1,200 meters (approx. 4,000 feet) using standard twisted-pair shielded cable. ➔ For larger outdoor deployments over miles, try pairing your cellular setup with long-range radio nodes.